
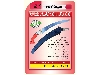


SAW
A hand saw is a fundamental tools you can find in every workshop and toolbox, whether you’re a professional woodworker, expert carpenter or DIY home repair enthusiast.
Supplier information
sun sajad trade
Iran (Islamic Republic of), IsfahanManufacturer, Importer, Wholesaler, Exporter, Service provider
lock , padlock , lock body , rim lock , security lock , Electrc rim lock , touch lock , thich type cruciform key , brass pad lock , Iron pad lock , handicrafts, Armoured cover pad lock , Rosette lock body , Cylinder lock , Door Knobs , Nuts
View supplier websiteBuy from the Top Suppliers on Mefair!

Mefair’s top suppliers have faster response times and offer more up-to-date products compared to other suppliers.


Specifications
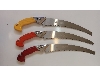
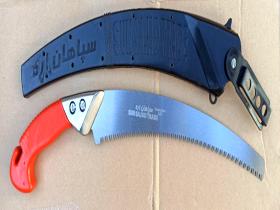
- cuting
- wood
- saw
- samurai
- Left and right blade
- Sharpened blade
- Multifaceted blade
- Spring steel
- podded
- Attached to the belt
Product description
HOW TO USE A HAND SAW – A COLLECTION OF USEFUL TIPS FOR WORKSHOP
A hand saw is a basic tool for every woodworker. It is simple and easy to use, and with a little practice you get best results. Here are a couple tips with which you can improve your sawing precision and results.
1. USE RIGHT SAW FOR THE JOB.
There are three different types of sawblades for different types of cuts. Crosscutting, rip-cutting and hybrid teeth configuration. If you need to saw along the grain use the ripsaw.
When cutting across the grain best saw is a crosscut saw. If you are doing fine joineries such as tenons or dovetails, for best results, use the specialty saws made for the job. Hybrid saws are for the carpenters.
2.MARK THE CUTLINE.
Measure and mark where you want to cut. The marked line will act as a guide to help you get a straight cut. Remember the wise old saying: measure twice, cut once!
3. START THE KERF WITH THE RIGHT TECHNIQUE.
With a crosscut saw, start cutting with the teeth close the handle. That way you get the best control when starting the kerf. Make a few short draw strokes to get a kerf going.
If you’re using a ripsaw, start your cut with the finer teeth furthest from the handle (near the point of the blade).
Use your thumb or the knuckle of your thumb on the hand holding the wood as a guide to ensure you cut along the cutline.
4. START SLOW AND LET THE SAW DO THE WORK.
Don’t rush. You don’t have to press hard, the just light pressure is needed. After you’ve started the groove, a few short forward strokes will deepen the cut so you can move your left hand away from the blade.
Push the saw with an easy, free-running motion. Use long strokes so that each tooth does a fair share of the work. Short strokes dull the saw faster because only a few of the teeth do the work.
5. HOLD THE SAW PROPERLY.
Make a pistol hand, that is, point your index finger forward. That is the way you should hold the handsaw. Do not try to crush the handsaw blade with your grip. Pretend that the handle is fragile like a baby bird. The relaxed grip is the key for straight and accurate cuts.
6. DON’T TWIST THE BLADE.
Keep the saw blade perpendicular to your workpiece. Don’t twist the blade
7. LONG STROKES ARE THE KEY.
Use as long of strokes as possible. This will help you make straighter, smoother cuts, will make the blade last longer, and help the blade remove sawdust efficiently.
8. SECURE THE WORK BEFORE SAWING.
Clamp your work securely and support it well. Double check the area behind the workpiece is empty so that you don’t saw into your sawhorse or anything else you might regret. Be sure to remove any nails or staples that might be along your cut line.
9. USE A MITER BOX IF NEEDED.
If 90º or 45º angles are critical, use a miter box. If you’re making a long cut, clamp a 2×4 along the cut line to keep the saw on track.
10. THINK AHEAD.
To get straight cuts, pay more attention to where you want the saw to go than where it is.
11. MASKING TAPE AND SCORING THE LINE PREVENTS SPLINTERING.
To prevent splinters, use masking tape along both sides of the cut. To further reduce the splinters, run the marking knife along the cut before sawing.
12. SHARP AND WELL-SET TEETH FOR BEST PERFORMANCE.
Every cutting tool should be as sharp as possible and the saw is no exception. Saw blade have to be straight and the setting of teeth needs to be even. Sharpen or replace dull or bent blades and adjust the setting if uneven.
13. PROTECT SAW BLADES WHEN NOT IN USE.
To protect the blades (and protect you from the blades) use blade cover when storing the saw. A saw till is also a good way to store hand saws and keep them sharp during storage. You could easily make blade covers from split garden hosed or buy some slide bars from office supply store.
14. A CLEAN SAW WORKS BETTER.
All tools work better when clean and dry. Keep the dirt away from the blades. Dirty blades are most likely to bind and rust. Don’t use the saw if there is uncured glue on the workpiece, wet glue is the enemy for sawblades. Store your handsaws in a climate controlled area to prevent rust.
15. LEARN TO SHARPEN THE BLADE.
Sharpening and setting saw blades can be done by hand, but it takes special tools (or a lot of experience) to do it right. Doing it wrong can ruin the blade. But a dull saw can ruin your work.
16. USE THE GUIDES FOR STRAIGHT CUTS.
If you are having problems getting straight cuts, you can use or device a guide from 2×4 or any straight piece of wood. Clamping the 2×4 along the cutting line will ensure true and square cut, it will act as a guide for your saw to keep it on the line
17. PREVENT BINDING WITH A NAIL.
Sometime the wood could have internal stresses that want to shut the kerf and bind the blade. This usually will happen when ripping a long board. Simple nail will keep the kerf open if placed into a kerf. For a very long ripping cut, move the nail along as you saw.
18. PAY ATTENTION TO YOUR POSE.
Good sawing pose is essential for a straight and effortless sawing. It is important to hold your elbows close to your body to counteract the natural tendency to angle the blade. It will also to prevent the twist and tilt of the blade ensuring a clean cut.
Other company Products and Services
-
![Gazor hinges pump (door closer)]() Gazor hinges pump (door closer)
Gazor hinges pump (door closer)Pneumatic Tools
-
![Welding mask]() Welding mask
Welding maskWelding Equipment - Other
-
![Pitcher slurry]() Pitcher slurry
Pitcher slurryTools - Other
-
![Handle shovel]() Handle shovel
Handle shovelTools - Other


